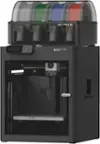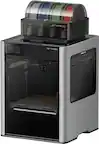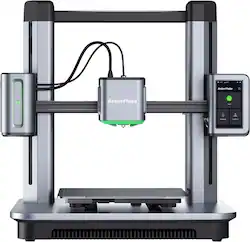
AnkerMake - M5 Speedy 3D Printer - Gray
- Key Specs
- Networking: Wireless
- Printer Type: 3D Printer
- Leveling Capability: Automatic
- General
- Brand: AnkerMake
- Model Number: V81111C1
- Product Name: M5 Speedy 3D Printer
- Color: Gray
- Display Screen: true
- Display Screen Size: 4 inches
- Dimensions
- Product Height: 18.62 inches (The out of box height of the item. Height is measured as the vertical distance from the bottom of the item to the top as it would be primarily used or placed.)
- Product Width: 19.69 inches (The out of box width of the item. Width is measured as the horizontal distance from one side of the item to the other as it would be primarily used or placed.)
- Product Depth: 17.2 inches (The out of box depth of the item. Depth is measured as the distance from the front of the item to the back as it would be primarily used or placed.)
- Product Weight: 27.78 pounds (The out of box weight of the item.)
- Print Height: 250 millimeters
- Print Length: 235 millimeters
- Print Width: 235 millimeters
- Connectivity
- Wired Connectivity: USB-C
- Wireless Connectivity: Wi-Fi, Bluetooth (The manner in which a device sends data to another device over a short distance without the use of wires or cables.)
- Media Card Slot: USB-C Flashdrive
- Features
- Built-in Camera: true
- Leveling Capability: Automatic
- Assembly Required: Yes
- Filament Type: Spool
- Build Platform Info
- Build Platform Material: Cast aluminum
- Heated Build Platform: true
- Build Info
- Compatible Build Material(s): PLA, PETG, ABS, TPU
- Performance
- Number of Extruders: 1
- Warranty
- Warranty - Parts: 3months
- Warranty - Labor: 12months
- Other
- UPC: 194644106140
Explore the 3D Printing Frontier Ease of use, speeds, and precision enables the creator in you to bring your imagination to life through 3 dimensional objects. Meet the AnkerMake M5, the 3D Printer designed for the creator in everyone.Easy to assemble and use, the M5 can have you printing within 15 minutes. Just unbox, assemble, insert filament. The 8GB memory stores pre-loaded objects to let you experiment right away. Easily control your prints via the integrated touchscreen or mobile devices such as your phone or laptop. Spend time designing not printing. With an upgraded printing speed of 500mm/s[1] the M5 allows you to create more objects in faster time than competitive models. Great for making decorative or collectable items to missing parts.The Integrated camera with AI recognition ensures your print stays on track and notifies you of any errors. Additionally, auto-leveling will ensure consistent prints for each object you print.
- 80 Percent Faster Prints: Get prints fast with PowerBoost. A powerful stepper motor, double-belt driveshaft, and stabilized motion algorithm work together to push out loads of extra power.
- 0.1 mm Precision: Achieve precision even at 5X speed thanks to the new ultra direct extruder and integrated die cast aluminum alloy structure. Never compromise on stable quality even when you're printing at 5X speed. AnkerMake M5 frees yourself from sanding with smoothness.
- Error-Detecting AI Camera: M5 calculates a printing plan and uses extra processing power and an integrated intelligent camera to stick to it—keeping your model matching your design. It also detects errors in your print and sends you alerts so you can intervene.
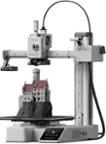
- Aluminum Alloy Design: The integrated die cast aluminum alloy structure and Z axis design increase the weight of the base, reducing the center of gravity of the machine. The design makes printing more stable for fast speed and turbo acceleration.
- Multi-Device Control: Whenever the moment of inspiration strikes, you'll be able to access your prints wherever you are. Remote control via the AnkerMake app, AnkerMake Slicer, or Alexa
- 49-Point Auto-Leveling: Give your prints accuracy with 7x7 auto-leveling. Advanced algorithms calculate a virtual height map to get the print started right.
Whats Included
- Gantry
- Printer Base
- Filament Holder
- Power Cord
- 150g Filament
- Screws x16
- Quick Start Guide
- Tool Box
Q: Does this printer have auto-leveling capabilities?
A: Yes, the AnkerMake M5 features a 49-point (7x7) auto-leveling system for accurate prints.
Q: What kind of materials can this 3D printer use?
A: The AnkerMake M5 is compatible with PLA, PETG, ABS, and TPU printing materials.
Q: How much faster is this 3D printer compared to standard models?
A: This 3D printer can be up to 5 times faster than standard 3D printers.
Q: What is the precision level of this 3D printer?
A: The AnkerMake M5 boasts a precision of 0.1 mm, even at its fastest printing speed.
Q: Can I control this 3D printer remotely?
A: Yes, you can control the M5 remotely using the AnkerMake app, AnkerMake Slicer, Alexa, or Google Assistant.
Q: What is the maximum print height this 3D printer can handle?
A: The AnkerMake M5 has a maximum print height of 250 millimeters.
Q: How does the AI camera on this printer enhance the printing process?
A: The AI camera actively monitors the printing process, ensuring the print aligns with your design and alerts you to any errors.
Q: what exactly is needed to run this machine and create?
A: I can elaborate on the whole 3D printing steps as I am just from a beginner to knowing how to 3D print successfully Step 1. Get the model file We can google and download STL/OBJ files directly. Or, you can use professional design tools like zbrush, C4D, Blende and Autodesk Fusion 360 to design by yourself, which needs more skills and I have not put much effort into this part myself. Step 2. Send the model file to a slicer software As mentioned in FAQ on Kickstarter: AnkerMake M5 works best with AnkerMake Slicer, software developed by AnkerMake to best work with M5. The software is optimized to achieve high-speed printing. In addition, only AnkerMake Slicer supports Al recognition. If you prefer, M5 supports Cura and Simply3D andPrusaSlicer. AnkerMake Slicer will release when we ship the printers to our backers. There are 4 ways to send a model file to the printer: - Copy the file to M5 with a USB-C flash drive - Use AnkerMake Slicer to send via Wi-Fi - Send via USB-C with AnkerMake Slicer - Use the AnkerMake app to send wirelessly Step 3 Start printing